
Onstep Telescope Controler
EQ350DX/550DX Onstep GOTO Controler
The Onstep goto controler
The Goto control unit expands the possibilities or your telescope. It allows you to compensate the rotation of the earth, automatically find objects and connect to an external computer via USB-cable, Bluetooth and Wifi.
The controller and its interfaces are shown in Fig.1
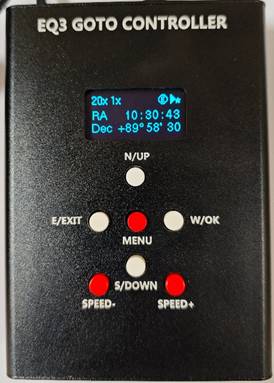
Fig. 1 EQ350DX/550DX Onstep GOTO Controler
The controler features some connectors on the top (see fig, 2) and a display and 7 buttons on the front. The LCD dispaly screen can display three lines of text or graphics. The contrast is adjustable.
Buttons:
N/UP: Slew the telescope to north,or Scrolling through the options within a selected menu.
S/DOWN: Slew the telescope to south,or Scrolling through the optionsl within a selected menu.
E/EXIT: Slew the telescope to east,or return to the previous menu.
W/OK: Go to the next menu level or to choose an option in a menu.
SPEED-: Reduce the slew speeds
SPEED+: Increase the slew speeds
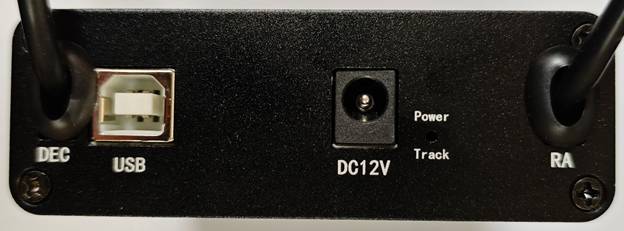
Fig. 2: Control box top view
DC port: 12V DC input.
USB port: Provides connection with a PC.
RA: Connect to the RA motor.red cable.
DEC: Connect to the DEC motor.black cable.
LED: Serves as a power-on indicator and provides other statuses.
Menu Tree Overview
Main Menu | Goto | Stars | Bright Stars |
|
|
| STF** |
|
|
| STT** |
|
|
| GCVS~* |
|
| Deep Sky | Messier |
|
|
| Caldwell |
|
|
| Herschel400 |
|
|
| Collinder |
|
|
| NGC |
|
|
| IC |
|
| Solar System | Sun |
|
|
| Mercury |
|
|
| Venus |
|
|
| Mars |
|
|
| Jupiter |
|
|
| Saturn |
|
|
| Uranus |
|
|
| Neptune |
|
|
| Moon |
|
| USER |
|
|
| Filter¥ | Reset filters |
|
|
| -Above Horizon- |
|
|
| Constellation |
|
|
| Type |
|
|
| Magnitude |
|
|
| Nearby |
|
|
| Var*Max Per. |
|
|
| Dbl*Min Sep. |
|
|
| Dbl*Max Sep. |
|
| Coordinates |
|
|
|
|
|
|
| Spiral Search |
|
|
| Last |
|
|
| Home |
|
| Sync | Stars | Bright Stars |
|
|
| STF** |
|
|
| STT** |
|
|
| GCVS~* |
|
| Deep Sky | Messier |
|
|
| Caldwell |
|
|
| Herschel400 |
|
|
| Collinder |
|
|
| NGC |
|
|
| IC |
|
| Solar System | Sun |
|
|
| Mercury |
|
|
| Venus |
|
|
| Mars |
|
|
| Jupiter |
|
|
| Saturn |
|
|
| Uranus |
|
|
| Neptune |
|
|
| Moon |
|
| Here |
|
| Align | 1-Star Align |
|
|
| 2-Star Align |
|
|
| 3-Star Align |
|
|
| 4-Star Align |
|
|
| 5-Star Align |
|
|
| 6-Star Align |
|
|
| 7-Star Align |
|
|
| 8-Star Align |
|
|
| 9-Star Align |
|
|
| Show Model |
|
|
| Clear Model |
|
|
| Reset Home |
|
|
| Refine PA |
|
| Parking | Park |
|
|
| Un-Park |
|
|
| Set-Park |
|
| Tracking | Stop |
|
|
| Sidereal |
|
|
| Solar |
|
|
| Lunar |
|
|
| Comp Full |
|
|
| Comp Refr |
|
|
| Comp Off |
|
|
| Comp Sngl Ax |
|
|
| Comp Dual Ax |
|
|
| Rate Reset |
|
|
| Rate +0.02Hz |
|
|
| Rate -0.02Hz |
|
| Settings | Date/Time | Local Date |
|
|
| Local Time |
|
|
| Local Time DST? |
|
| Site | Select Site |
|
|
| Latitude |
|
|
| Longitude |
|
|
| UTC Offset |
|
| Display | Turn Off |
|
|
| Contrast |
|
|
| Dim Timeout |
|
|
| Blank Timeout |
|
| Buzzer |
|
|
| Meridian Flip | Now! |
|
|
| Automatic |
|
|
| Pause at Home |
|
| Configuration | Goto Speed |
|
|
| Backlash |
|
|
| Limits |
|
|
| Pier Side |
|
| Firmware Ver |
|
PART II : INITIALIZATION
2.1SetupSetup Home Position
Before powering on the telescope mount, it should be setup to a particular home position.
Home Position of an Equatorial Mount:
•Tripod head is leveled.
•R.A. axis points towards the Northern Celestial Pole (in Northern Hemisphere) or the Southern Celestial Pole (in Southern Hemisphere).This is Pole alignment.
•Counterweight rod is at its lowest position.
•The telescope points towards the Northern Celestial Pole (in Northern Hemisphere) or the Southern Celestial Pole (in Southern Hemisphere).
2.2Quick Operation
2.2.1Powering on the telescope mount,LED Intermittent one flash,the mount tracks at sidereal speed.
2.2.2Use the direction buttons(N/UP,S/DOWN,W/OK,E/EXIT) to slew the telescope to align with the object.
2.2.3Focusing the object,then observe.
2.3Initialize the Controller
Once the mount has been setup to the home position, the user can turn on the power to the mount and start the initialization process on the controller.
2.3.1Setting Information of the Observing Site
2.3.1.1Press and hold the MENU button to enter the main menu.Use N/UP and S/DOWN button scroll to Settings.
2.3.1.2Press the W/OK button to enter the Settings menu.Use N/UP and S/DOWN button scroll to Site.
2.3.1.3Press the W/OK button to enter the Menu Site.Use N/UP and S/DOWN button scroll to Latitude.
2.3.1.4Press the W/OK button to enter the Latitude menu.Use N/UP and S/DOWN button adjust Latitude.Upon completion of adjustment,Press the W/OK button to confirm.
Or press the E/EXIT button to cancel,return to the previous menu.
Tips:Press and hold the N/UP and S/DOWN button to speed up the adjustment.
2.3.1.6Press the W/OK button to enter the Longitude menu.Use N/UP and S/DOWN button adjust Longitude.Upon completion of adjustment,Press the W/OK button to confirm.
Or press the E/EXIT button to cancel,return to the previous menu.
2.3.1.8Press the W/OK button to enter the UTC Offset menu.Use N/UP and S/DOWN button adjust UTC Ofs.Upon completion of adjustment,Press the W/OK button to confirm.
Or press the E/EXIT button to cancel,return to the previous menu.
2.3.2Date,Time,Daylight Saving Time
2.3.2.1In the Settings menu.Use N/UP and S/DOWN button scroll to Date/Time.
2.3.2.2Press the W/OK button to enter the Menu Date.Use N/UP and S/DOWN button adjust Local Date. Upon completion of adjustment,Press the W/OK button to confirm.
Or press the E/EXIT button to cancel,return to the previous menu.
2.3.2.3Use N/UP and S/DOWN button adjust Local Time. Upon completion of adjustment,Press the W/OK button to confirm.
Or press the E/EXIT button to cancel,return to the previous menu.
2.3.2.4 Use N/UP and S/DOWN button adjust Local Time DST in YES or NO.Upon completion of adjustment,Press the W/OK button to confirm.
Or press the E/EXIT button to cancel,return to the previous menu.
2.4Align
Upon completion of initialize the Controller,we can align the mount.Only the align is completed,the mount can GOTO the object in datebase.
The controller included 1-Star Align to 9-Star Align,Multi-star align operation is equivalent to multiple 1-star align operations.An example below is 1-star align.
2.4.1Press and hold the MENU button to enter the main menu.Use N/UP and S/DOWN button scroll to Align.
2.4.2Press the W/OK button to enter the Alignment menu.Use N/UP and S/DOWN button scroll to 1-Star Align.
2.4.3Press the W/OK button to enter the Align menu.Use N/UP and S/DOWN button enter star list.
2.4.4Use N/UP and S/DOWN button scroll in star list,Press the W/OK button to confirm The mount will then automatically slew and point the telescope towards the alignment star in the sky.
2.4.5 After the mount stops, the controller will display “Recenter Star1”. Now the telescope should point rather closely to the alignment star,and the mount’s tracking function is also turned on by the controller to prevent the objects drift in the FOV of the telescope.
2.4.6Use the direction buttons(N/UP,S/DOWN,W/OK,E/EXIT) to slew the telescope to align with the alignment star. That is star in the FOV of the finder scope, and then center it in the FOV of the telescope’s eyepiece; press MENU button to confirm centering of the star .
2.4.7The screen display “Alignment Success”,then return Main screen.
Another alignment options
A.Show Model:after align,display alignment error.
B.Clear Model:clear alignment data.
C.Reset Home:slew the telescope to Home Position.
D.Refine PA: improve pointing accuracy.
PART III : LOCATING OBJECTS
Users can access several popular celestial object catalogs stored in the controller and drive the telescope mount to locate a specific object in the catalogs.
Tips: If the selected object is below the horizon at this time, the controller will display "Target is Below Horizon!".Press E/EXIT button return to the previous menu.
3.1GOTO Stars
3.1.1Press and hold the MENU button to enter the main menu.Use N/UP and S/DOWN button scroll to GOTO.
3.1.2Press the W/OK button to enter the GOTO Stars menu.Use N/UP and S/DOWN button scroll in "Bright Stars / STF** / STT** / GCVS~*" datebase.
3.1.3Press the W/OK button to select a datebase.Use N/UP and S/DOWN button scroll in datebase.
3.1.4Press the W/OK button to select a star in datebase,controller drive mount to locate the star.
3.2GOTO Deep Sky
3.2.1Press and hold the MENU button to enter the main menu.Use N/UP and S/DOWN button scroll to GOTO.
3.2.2Press the W/OK button to enter the GOTO Deep Sky menu.Use N/UP and S/DOWN button scroll in "Messier / Caldwell / Herschel400 / Collinder / NGC / IC" datebase.
3.2.3Press the W/OK button to select a datebase.Use N/UP and S/DOWN button scroll in datebase.
3.2.4Press the W/OK button to select a Deep Sky object in datebase,controller drive mount to locate the object.
3.3GOTO Solar System
3.3.1Press and hold the MENU button to enter the main menu.Use N/UP and S/DOWN button scroll to GOTO.
3.3.2Press the W/OK button to enter the GOTO Sol Sys menu.Use N/UP and S/DOWN button scroll in Solar System datebase.
3.2.3Press the W/OK button to select a object in datebase,controller drive mount to locate the object.
3.4GOTO USER
User can edit a object,save in USER datebase.
3.5Filters
3.6Coordinates
In the coordinates menu,you can input RA and Dec,the controller drive mount slew to the coordinates.
3.7Spiral Search
The controller drive the telescope begins to move in a spiral pattern at a very slow speed around the search area.Look through the eyepiece and when the object does become visible, press E/EXIT to stop the spiral search.Then use the direction buttons (N/UP,S/DOWN,W/OK,E/EXIT) to center the object.
3.8Last
The controller drive the mount slew to the last object.
3.9Home
The controller drive the mount slew to the home position.
PART IV : ADVANCED FUNCTIONS
4.1Sync
The point error will increase after series GOTO.At this time,the telescope can be drive to a datebase object,slew to the center of eyepiece,sync to the object in datebase can be use to eliminate the accumulated error.
4.1.1Use the direction buttons (N/UP,S/DOWN,W/OK,E/EXIT) drive the telescope to a database object,such as a bright star(or a familiar object).
4.1.2Press and hold the MENU button to enter the main menu.Use N/UP and S/DOWN button scroll to Sync.
4.1.3Press the W/OK button to enter the Sync menu.Use N/UP and S/DOWN button scroll in "Stars / Deep Sky / Solar System / Here",select the corresponding database.
4.1.4Finded the object in datebase,press the W/OK button to confirm.
4.1.5The screen display “Telescope Synced”.
4.2Parking
If the mount of the telescope have not been moved after an observing session, the user can park the telescope to keep the alignment data,and start observing in the next session without redoing the alignment.
4.2.1Press and hold the MENU button to enter the main menu.Use N/UP and S/DOWN button scroll to Parking.
4.2.2Press the W/OK button to enter the Parking menu.Use N/UP and S/DOWN button scroll to Park.
4.2.3 Press the W/OK button,the controller drive the mount slew to park position. The controller will not respond to all operations until the user Un-park.
4.3Tracking
4.3.1Start/Stop tracking
4.3.1.1Press and hold the MENU button to enter the main menu.Use N/UP and S/DOWN button scroll to Tracking.
4.3.1.2Press the W/OK button to enter the Tracking menu.Use N/UP and S/DOWN button scroll to Stop or Start.
4.3.1.3If display “stop”,means the mount is tracking.Press W/OK stop tracking,the screen display”Start”,the mount will stop tracking.Or press E/EXIT return to the previous menu.
4.3.2Tracking rates
4.3.2.1Press and hold the MENU button to enter the main menu.Use N/UP and S/DOWN button scroll to Tracking.
4.3.2.2Press the W/OK button to enter the Tracking menu.Use N/UP and S/DOWN button scroll to Sidereal or Solar or Lunar.
4.3.3Press the W/OK button to select a options for tracking.Solar for the sun observe,Lunar for the moon observe,sidereal for others.
WARNING!
Looking at or near the Sun will cause instant and irreversible damage to your eye.
4.3.3Rate compensation
It is usually not necessary to set up.
4.4Settings
Date/Time,Site set in section 2.3.
4.4.1Display
4.4.1.1Press and hold the MENU button to enter the main menu.Use N/UP and S/DOWN button scroll to Settings.
4.4.1.2Press the W/OK button to enter the Settings menu.Use N/UP and S/DOWN button scroll to Display. Press the W/OK button to enter the Display menu.
4.4.1.4Turn off:turn off the screen immediately,press any button to turn on.
Contrast:adjust the screen contrast,included:Min,Low,High,Max.
Dim timeout:included Disabele,30 sec,60 sec.
Blank Timeout:included Disable,1 min,2 min,3 min,4 min,5 min.
4.4.2Buzzer
4.4.2.1Press and hold the MENU button to enter the main menu.Use N/UP and S/DOWN button scroll to Settings.
4.4.2.2Press the W/OK button to enter the Settings menu.Use N/UP and S/DOWN button scroll to Buzzer.
4.4.2.3Press the W/OK button to enter the Buzzer menu.Use N/UP and S/DOWN button scroll to No or Yes.
4.4.2.4Press the W/OK button to select a options.
4.4.3Meridian Flip
On an equitorial mount, the controller automatically decides whether to perform a meridian flipping at the begining of a GOTO, to prevent telescope bumping on the tripod. In some occasion, astrotographers can choose whether to do a meridian flip or not.
4.4.3.1Press and hold the MENU button to enter the main menu.Use N/UP and S/DOWN button scroll to Settings.
4.4.3.2Press the W/OK button to enter the Settings menu.Use N/UP and S/DOWN button scroll to Meridian Flip. Press the W/OK button to enter the Meridian Flip menu.
4.4.3.3Meridian Flip menu included:Now!,Automatic,Pause at Home.Press the W/OK button to select a options.
4.4.3.4Now!:meridian flip immediately.
Automatic: let the controller decide automatically.
Pause at Home:the telescope slew to home position,then stop.
4.4.4Configuration
4.4.4.1Press and hold the MENU button to enter the main menu.Use N/UP and S/DOWN button scroll to Settings.
4.4.4.2Press the W/OK button to enter the Settings menu.Use N/UP and S/DOWN button scroll to Configuation. Press the W/OK button to enter the Configuration menu.
4.4.4.3Meridian Flip menu included:GOTO Speed,Backlash,Limits,Pier Side.Press the W/OK button to select a options.
4.4.4.4GOTO Speed included:Fastest,Faster,Default Speed,Slower,Slowest.
Backlash included:Axis 1 RA/Az,Axis 2 Dec/Alt., entering a number,unit in arc-seconds,number bigger means backlash bigger,default is zero.
Limits included:Horizon,Overhead,Meridian E,Meridian W. This option limits the slew range of the telescope.
Pier Side include:Best,East,West. This option limite the direction of the telescope when goto the object near the zenith.Default is Best,let the controller decide automatically.
4.4.5Firmware Ver
Displays the controller firmware version.